


母親節一整天在外面累壞了
去書店
又去板橋的一間烘焙大賣場
買了一罐 日式抹茶粉 ( 70 g )
Img src : http://www.teazonline.com/servlet/the-63/matcha-green-tea-powder/Detail
用這種日式抹茶粉烤出來的抹茶戚風
其顏色可以保持為墨綠色
若使用一般綠茶粉
除了烤完顏色會改變之外
香氣也不夠
Img src : http://anotherteablog.blogspot.com/2008/01/dens-tea-matcha-kaze.html

一般綠茶粉會被蛋糕本身的蛋味覆蓋掉
而無法凸顯這種抹茶戚風的特色
上課時發現用這種日式抹茶粉
做出來的戚風非常優秀 !
沒有想像中抹茶點心可能有的苦澀味
原本是打算做紅蘿蔔戚風蛋糕
來孝敬我們家的戚風小麻豆
感謝她平日拍照的辛勞 !
可惜那天到家時太晚了
來不及去買新鮮紅蘿蔔
又剛好買了日式抹茶粉
就改做抹茶戚風了 !
可惜啊.....可惜 !!
因為抹茶粉中含有咖啡因
戚風小麻豆這次要 看著戚風乾瞪眼 了 !
看得到吃不到....
還是把蛋糕藏起來好了 !
重點來了!
Anyway lets do it !
食譜: 17cm模的份量 (參考引用自日本赤崛博美小姐的配方)

抹茶牛奶麵糊:
蛋黃 40 g
細砂糖 40 g
沙拉油 40 cc
牛奶 80 cc
日式抹茶粉 10 g
低筋麵粉 80 g
鹽 1/8 小匙
蛋白霜:
蛋白 160 g
細砂糖 30 g
Ingredients: For a 17cm chiffon mode.
Matcha Milk Batter
40 g egg yolk
40 g caster sugar
40 cc salad oil
80 cc milk
10 g Janpanese green ten powder
80 g flour
1/8 tsp salt
Meringue
160 g 3gg white
30 g caster sugar
作法 / Steps:

首先
還是一句老話
將所有需要的材料都先秤好
抹茶粉 + 低筋麵粉 + 鹽 共同過篩 2 次
Prepare all the ingredients first.
And sieve the Japanese green tea powder, flour and the salt together for twice.
 開啟烤箱開關預熱
將溫度設定在約175度
須預熱至烤模入爐前
Ture the oven on to preheat it.
Set the temperature at 175 centigrade.
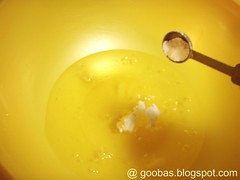
先製作抹茶牛奶麵糊 Make the egg/grape batter first.
 將細砂糖 40 g 的三分之一量倒入蛋黃中
充分攪拌至無顆粒為止
Blanch the egg with the 1/3 of the 40 g sugar until its smooth.
 將剩下的細砂糖的一半加入攪勻
Add 1/2 of the left sugar and whip again.
最後將剩下的細砂糖完全倒入
攪打至完全光滑無砂糖顆粒為止
Add all the rest sugar this time and mix it.
Still, until its smooth & shinny.

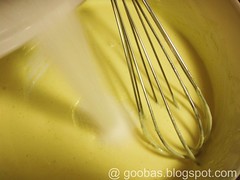
 將 沙拉油 倒入攪勻
Add the 40 cc vege oil into the egg batter.
Mix it.
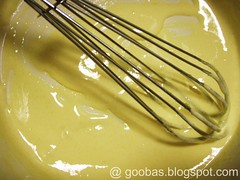
 將 牛奶 倒入攪勻
Add the milk into the egg batter.
Mix it.
 將 ( 抹茶粉 + 低筋麵粉 ) 及 鹽 " 1次倒入" 蛋糊中
Add the green tea powder, flour and 1/8 tsp salt into the egg batter.
 攪拌時動作要輕快
只需輕輕攪勻就好
不可過度攪拌
Mix the flour with the batter lightly until u cant see any white flour in the batter.
No need to mix it utoo much.
至此即完成第一階段的抹茶牛奶麵糊
接下來要製作蛋白霜 Now move to the meringue then.
 注意, 攪打蛋白霜的所有容器及器材需完全乾淨
不可有任何水份及油脂附於其上
可再開始打蛋白前加入約1/4茶匙的塔塔粉
可加 可不加, 並開始攪打蛋白
Be careful that there's no water/oil sticks on ur mixing bowl and blender.
You can add 1/4 tsp cream of tartar if u want.
And then whip the egg white.
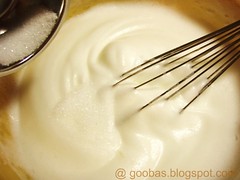
 蛋白攪至如圖般膨脹後
第一次加入細砂糖 20 g的三分之一
並從慢速打至快速
As the egg white become expanded,
Add 1/3 of the 30 g sugar
and start whipping it from slow speed to fast one.
 待蛋白開始稍為難以流動後加入第二次的細砂糖
再度攪打
並加入第三次的細砂糖
持續攪打至下張圖中所示的狀態
Add sugar for the 2nd time when the meringue become hard to flow, looks like as the above images shown.
Then add sugar for the 3rd time and whip it until the meringue looks like the same as the following image shown.
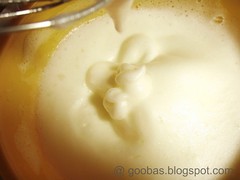
 圖中所示為已完成的蛋白霜
將蛋白霜拉起時
頂端會立起並微微下垂
注意, 若拉起的蛋白霜頂端完全立起
且無下垂狀時
為過度打發
須重新來過
The meringue above is about done.
You can see the top of the meringue is quite stiff and looks droopped.
That's it and it's time to stop whipping.
接下來將蛋白霜與蛋黃麵糊混合 Mix the egg/grape batter with the meringue.

以打蛋器舀起約四分之一的蛋白霜
混入抹茶麵糊盆中
快速確實地攪勻
Use the blender to scoop about 1/4 of the meringue into the batter and mix it quickly and lightly.

改用橡皮刮刀再舀起少量蛋白霜至抹茶麵糊盆中
繼續拌勻
手勢要輕快
Use a spatula to get some meringue into the batter and mix it again.

為免蛋白霜水離
將蛋白再輕輕大攪幾次
Mix the meringue again for a few times very lightly.
 將 抹茶麵糊 "倒回 蛋白霜盆 內 "
輕輕拌勻
注意盡量不要讓蛋白霜消泡
Pour the egg/grape batter into the meringue mixing bowl
and mix them lightly.
將兩者混合至完全看不到蛋白霜的蹤跡
Mix them until there's no white meringue there.
 將完成的麵糊緩緩倒入戚風模中
並用橡皮刮刀將表面整平
Pour into the chiffon cake mode slowly.
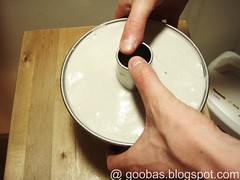 注意這步驟需使用雙手
將雙手大拇指各自扶住戚風模的中空柱兩側
另外兩手的四指各扶住烤模底部兩側
將烤模往下輕敲兩下
使多餘空氣釋出
Drop the mode from about 5cm high from a desktop.
 可用橡皮刮刀將麵糊朝烤模壁頂緣刮攏
可使戚風蛋糕長得更好
Using the spatula to move some batter to the edge of the mode will help the chiffon cake become taller.
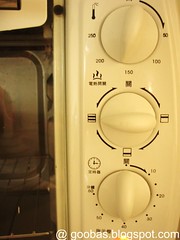 將烤模送入烤箱中
烘烤溫度調降至170度
烘烤時間約 30 ~ 40分鐘
Put the mode in the oven.
Reset the temperature at 170 centigrade, for 40 min.
烘烤過程中請勿任意開啟烤箱 No opening during baking.

烘烤過程中表面會稍微裂開
為正常現象
The cake will " blossom " a bit/a lot during the baking.
No worry, that's kind of normal.
 烘烤時間一到
打開烤箱以竹籤插入蛋糕內檢視
若竹籤沒有沾黏蛋糕液即完成
若有沾黏則再多加烤 3-5分鐘
When the oven is just shutting down.
Use a stick to stab into the cake to see if the cake is ready.
If there's still some batter sticks on it, then give it more 3-5 min.
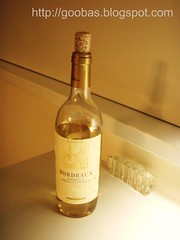 出爐後的烤模須馬上倒扣
準備一只內裝有液體不容易傾倒的長頸瓶
例如圖中裝滿白酒的酒瓶
Use a bottle with long neck and filled with liquid in to place the mode upside down.
 將烤模中空柱穿過酒瓶長頸
倒扣放至完全涼透為止
未完全放涼的蛋糕不可脫模
蛋糕放涼後以薄刀小心仔細地脫模
Until the mode/cake is cooled,
dont touch it.
As cooled,
use a very thin knife to get the cake out of the mode.


切片後看起來好像抹茶吐司

給 Tim 帶著當下午茶

我的早餐
擠上一些葉片型鮮奶油
抹茶戚風搭配鮮奶油非常對味 !
.jpg)


6 comments:
請問一下
我照你的配方作過可樂 養樂多
這次抹茶的做法有點差異
為什麼糖要分三次下到蛋黃
是因為比較好打散嗎
日本配方滿多都會加熱油跟液體至體溫
但我一直找不到答案為什麼
Rachel知道嗎
蛋黃部分的糖分 3 次加
是為了確保砂糖可以溶解得很均勻
如果一次將糖全部倒入蛋黃內
要將砂糖攪勻可能會花上更久的時間
且糖還不一定會完全溶解
此時若再繼續攪打下去
蛋黃的體積可能會過度膨脹或泛白得厲害
可是砂糖還是未完全溶解的情況
因此藉由循序漸進地加糖
不但可以使讓砂糖快速地溶解進蛋黃中
更可確保蛋黃不至於過發
另外關於加熱油跟液體至體溫
這是俗稱的燙麵法
我們烘焙課老師有提過
像這樣經過燙麵後
烤出來的蛋糕會比較有彈性
我最近比較少作戚風了
我覺得戚風失敗的經驗愈多
可以學到愈多
試過很多種配方跟不同的作法
就會知道自己到底喜歡哪一種戚風
喔我忘了說了
可樂戚風那個配方的糖量很少
所以我就一次加了
這抹茶的比較甜
糖我就多分幾次加進去
比較保險
抹茶的會甜嗎...
Rachel吃這麼低糖
ㄏㄏ可樂那個我有在加20左右的糖
但是還是很不甜
我今天又作一次特砂分三次下
還是有顆粒
所以有稍微隔水打了一下
蛋黃有點發了...
這樣不好嗎增加蛋糕的體積
和蛋黃的柔軟口感
這次成品烤出來倒扣冷卻後表面有點濕粘呢
是因為抹茶粉的關係嗎
之前的戚風都沒這問題
我們這邊戚風沒有把蛋黃跟糖打
而是油.液體部分蛋黃
然後粉類和剩下蛋黃
最後拌入蛋白霜
我在想如果把抹茶這配方
糖移到蛋白打
會有什麼差異
阿對了謝謝你回答我的問題
蛋黃打過發的情況我沒經驗說
可能是因為我糖量都放得很少的關係
我都打到蛋黃泛白且體積增加約一倍
妳覺得較發的蛋黃烤出來的戚風有沒有更軟勒 @.@
這個打法是參考 赤崛博美的超Q潤戚風 來的
是日本流行的戚風作法
不過台灣比較不流行
台灣不流行將蛋黃跟糖一起打
而是將配方中全部的糖都移到蛋白霜的部分打
蛋白霜部份的糖份愈高
可以幫助蛋白打發
並增加蛋白霜的穩定性(不容易消泡)
因此較容易且較快打到乾性發泡
但是赤崛博美要的是溼性發泡的蛋白霜
所以她可能覺得在蛋白霜部分的糖少一點沒關係
反正她不想蛋白霜那麼發
而溼性發泡的蛋白霜做出來的戚風確實如書名般
有 "Q潤" 的口感
我感覺超Q潤戚風的組織看起來就好像麵包一樣
但蛋白霜部分的糖份也不能無限量地增加
否則就變成像在作馬卡龍的蛋白霜了
之前我做過幾次的馬卡龍
我感覺馬卡龍的那種高糖份蛋白霜沒有彈性可言
作的點心種類一多
就覺得戚風還真得很嬌貴難伺候
有空歡迎來分享討論做點心的心得壓
^+++++^
喔忘了回
表面溼黏大部分是因為沒烤透
尤其是會有 蛋糕表面的中央處溼黏 的情況
下次烤好用竹籤先測試是否沒沾到蛋糕糊
如果確定蛋糕內部都熟了
關烤箱爐火
讓蛋糕在裡面用餘溫多悶個 5 分鐘
可能蛋糕冷卻後 表面就不會那樣怪怪的
Post a Comment