


 這個配方是烘焙課學的
原本課堂上是做抹茶口味的戚風
但是因為家裡沒有那種很香的抹茶粉
只有很奇怪的 " 玄米 " 抹茶粉
所以改用紅茶葉取代
照片來源 :
http://www.teafortealovers.co.uk/tea-health.php
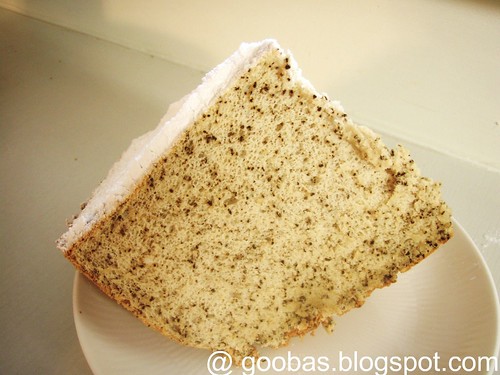
像這類直接加入紅茶碎葉的紅茶戚風似乎蠻常見的
紅茶的味道真的很濃郁
吃一口這戚風蛋糕
那紅茶的味道可以在口中延續數分鐘都不會消失 !
真的是可以細細品嚐的一種口味
而且因為蛋糕本身有加了 100 g 鮮奶的關係
鮮奶加紅茶葉
感覺好像 " 一直在喝奶茶 " 一樣
而且是很高級的奶茶 !
不是一般用奶精粉蒙混過去的那種化學味道
另外
其實這個蛋糕會比我之前所寫的 3 種日本戚風蛋糕配方都難做一些 !
因為蛋黃及蛋白比例是 1 : 1
而之前赤崛的配方則是 1 : 4
落差非常地大
赤崛的配方因為蛋白比例重, 且均使用日式戚風模
要坍塌也很難 ! ( 就是比較容易成功, 有人說這種作法是偷吃步啦 ! )
而關於烘焙課所教的戚風作法也大不同
老師說這種先加熱鮮奶及油的方法叫做燙麵法
做出來的蛋糕會比較有彈性
之前烘焙課第一堂學的巧克力戚風也有在家實驗過
但是沒有很成功
巧克力味很重 !!
我覺得是因為我的機械磅秤在量 10 ~ 50 g 時會非常不準的關係
所以可可粉一定是多放了很多
粉愈多 蛋糕就會愈乾燥
謝天謝地 !
星期三我終於買了電子秤 !
就有膽子再實驗烘焙課所教的戚風
果然材料有秤準
做出來就比較接近它該有的樣子
我覺得做出來的蛋糕很柔軟且濕潤
老師給的這種戚風蛋糕的味道其實比赤崛博美的配方好很多
蛋黃與砂糖比例都多出許多
味道十分香甜
比較起來
我之前寫的 3 偏日式戚風味道清淡許多 ( 日式的組織像麵包較有韌性 )
且應該是更多的蛋黃可以讓烘焙課的戚風更細緻柔軟 !
重點來了!
Anyway lets do it !
食譜: 8 吋 活動模 的份量

蛋黃麵糊:
沙拉油 80 g
鮮奶 100 g
鹽 1/4 茶匙
紅茶茶葉 15 g ( 約市售茶包 8 包 )
過篩粉類:
低筋麵粉 110 g ( 過篩 2 次 )
玉米粉 10 g ( 過篩 2 次 )
蛋黃 6 個
蛋白霜:
蛋白 6 個
塔塔粉 1/4 茶匙
細砂糖 100 g
Ingredients: For a 8'' chiffon tin.
Egg yolk Batter
80 g salad oil
100 g milk
1/8 tsp salt
15 g black tea leaves
110 g flour
10 g cornstarch
6 Egg yolk
Meringue
6 egg white
100 g Caster sugar
作法 / Steps:

 將市售紅茶茶包剪開
茶葉倒入秤盤中
秤得 15 g 的紅茶葉 ( 約 8 包 )


將鮮奶及沙拉油倒入鍋中加溫至不會燙手的程度
再倒入攪拌盆中
Heat the milk & salad oil until its warm but not hurting hot.
Then pour it into a mixing bowl.

 將紅茶葉倒入過篩粉類盆中混勻後
倒入( 鮮奶 + 沙拉油 )盆中
Mix the black tea leaves with the flour & cornstarch, then add it into the warm milk/oil.

輕輕快速地拌勻, 不要過度攪拌
No need to mix it utoo much.

 將蛋黃一次倒入輕輕拌勻
Add all the 6 egg yolk in and mix it lightly.

接下來要製作蛋白霜 Now move to the meringue then.
 注意, 攪打蛋白霜的所有容器及器材需完全乾淨
不可有任何水份及油脂附於其上
可再開始打蛋白前加入約1/4茶匙的塔塔粉
可加 可不加, 並開始攪打蛋白
Be careful that there's no water/oil sticks on ur mixing bowl and blender.
You can add 1/4 tsp cream of tartar if u want.
And then whip the egg white.
 蛋白攪至如圖般膨脹後
第一次加入細砂糖 100 g的三分之一
並從慢速打至快速
As the egg white become expanded,
Add 1/3 of the 30 g sugar
and start whipping it from slow speed to fast one.
 待蛋白開始稍為難以流動後加入第二次的細砂糖
再度攪打
 在蛋白變得細緻時
加入第三次的細砂糖
持續攪打至下張圖中所示的狀態
Add sugar for the 2nd time when the meringue become hard to flow, looks like as the above images shown.
Then add sugar for the 3rd time and whip it until the meringue looks like the same as the following image shown.

接下來將蛋白霜與蛋黃麵糊混合 Mix the egg/grape batter with the meringue.

以打蛋器舀起約四分之一的蛋白霜
混入蛋黃葡萄麵糊盆中
快速確實地攪勻
Use the blender to scoop about 1/4 of the meringue into the batter and mix it quickly and lightly.
 改用橡皮刮刀再舀起少量蛋白霜至蛋黃葡萄麵糊盆中
繼續拌勻
手勢要輕快
Use a spatula to get some meringue into the batter and mix it again.

為免蛋白霜水離
將蛋白再輕輕大攪幾次
Mix the meringue again for a few times very lightly.
 將紅茶蛋黃麵糊 "倒回 蛋白霜盆內 "
輕輕拌勻
注意盡量不要讓蛋白霜消泡
Pour the egg/grape batter into the meringue mixing bowl
and mix them lightly.

 將完成的麵糊緩緩倒入戚風模中
並用橡皮刮刀將表面整平
Pour into the chiffon cake mode slowly.
 注意這步驟需使用雙手
將烤模由空中向下墜落 2~3 次
將烤模往下輕敲兩下
使多餘空氣釋出
Drop the mode from about 5cm high from a desktop.

將烤模送入烤箱中
烘烤溫度調降至170度
烘烤時間設定為 30 ~ 35 分鐘
Put the mode in the oven.
Reset the temperature at 170 centigrade, for 30 ~ 35 min.
烘烤過程中請勿任意開啟烤箱 No opening during baking.

烤好後倒扣放涼再脫模
Until the mode/cake is cooled,
dont touch it.
As cooled,
use a very thin knife to get the cake out of the mode.


因為家裡的動物性鮮奶油放太久壞掉了
只能灑些糖粉做裝飾 !


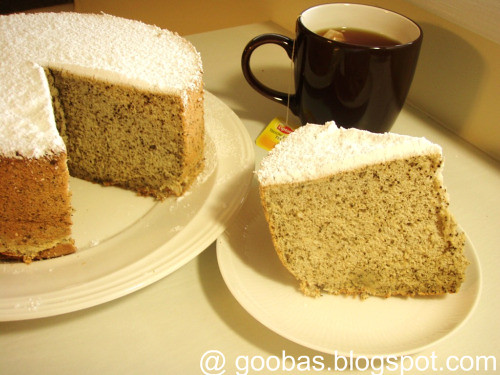
忘了說
這種紅茶葉戚風蛋糕
很適合搭配香草冰淇淋
你說我怎麼會知道 ??
應該有聽過 50 嵐賣的非常有名的 " 冰淇淋紅茶 " 吧 !
你就知道紅茶跟冰淇淋會有多相配了吧 ~
.jpg)


3 comments:
wow, looks good. I will try this one on the weekend. thanks! Anne~
Thanks for your detailed description which is very helpful for a beginner like me.
Will try your recipe for my children.
Thanks very much!!
You're welcome !
Hope u will have a good time together :P
Enjoy !
Post a Comment